Wednesday, March 23, 2011

Rules Of Composition

Rules, Rules! I hear you say. Not in this day and age!

No-one want s to be told what to do, especially when it comes to creative expression, but everyone wants to know how to do it better. There are things to be learned from even the most outdated compositional techniques (they where, after all, perfected over hundreds of years). So as long as we all realize that rules are meant to be broken, let's see what we can learn.

The rule of thirds:


The rule states that an image should be imagined as divided into nine equal parts by two equally-spaced horizontal lines and two equally-spaced vertical lines, and that important compositional elements should be placed along these lines or their intersections. Proponents of the technique claim that aligning a subject with these points creates more tension, energy and interest in the composition than simply centering the subject would.

The rule of thirds for portraits is that the subject's eyes should be positioned at the one-third mark from the top of the frame.


Rabatment of the Rectangle:

This is another (strangle named) rule for dividing up pictorial space. It is based on the idea that each rectangle contains 2 squares, one built from one of the shorter edges and the second form the other. This rule states that important

compositional elements should be placed along the inside edges of these imaginary squares to create visual tension.

the golden rectangle is a special case of rabatment. The squares made by the short side divides the rectangle into thirds that are the same ratio as the original rectangle.

“if it's not good enough, you're not close enough”

It is a good idea to focus in on the important part of your picture, give the viewer all the good stuff and none of the filler...unless of course the background context gives important details or positioning in the frame creates tension....like all rules, this one works well, except when it doesn't.


Colours:

Sometimes a colorful image is not one with a lot of different colours, but one that has a lot of one colour. This is one advantage of really focusing in on your subject, you can get a lot of one very vibrant colour without the distraction of other elements. Also, a scene in which there is a lot of one colour often makes an interesting and pleasing composition.


Black and White:

What makes a good black and white photo is a complete tonal range. This means that the whites white in the image is pure white, and the blackest black is pure black. This does not mean that there has to be an equal amount of blacks and whites in the image. Although there can be, you can also take very dramatic photos that are mostly dark or mostly white. Images with a lot of dark tones are referred to as “low-key” and images with a lot of paler hues are called “high-key”. However, even in these images it is important to have a complete tonal range.


Complimentary Colours:

Every colour has it's opposite, and when these composites are put together, they enhance each-other. Here are a list of complimentary colour pairings.


Red and green

blue and orange

yellow and violet

if you can create compositions using predominately one pair of these colours, the colours will appear very vibrant.


Of course, often what is most important about a picture is not that it has textbook composition, but that it captures a moment that has become a treasured memory. Pictures of loved one and special times have something that no amount of composition can make up for, and that is why they are our favorites!

Tuesday, March 8, 2011

Selling YOUR Art

Our Artist's Gallery Program is a great way to make your art available online, and make money without hassle. All you need to do is create an account, and you can direct interested buyers to your page, where they can order prints-on-demand of your work. This is a detailed run-through of how it works. For a quick overview see the page on our site.

Physical art galleries have many advantages. they are social meeting places and they allow viewers to be in the presence of the work in real life. Galleries also exist in only one place, so the work they display is only ever available to a select number of people who happen to be in the right place at the right time. Online galleries, on the other hand, have the potential to be seen by millions of people all over the world. Google's new Art Gallery Project is an example of how major art galleries are taking advantage of that very fact.

The Artist Gallery Program provides local artists with an online space to display their work and sell on-demand prints. This allows artists to take advantage of our expertise in creating custom art works on canvas and fine art paper and our shipping system. Artists can sell reproductions to customers all over Canada and the USA without the time commitment and cost of printing and shipping themselves. This gives you more time to do other things, like make work!

Get Started

1) Register online at Canada on Canvas. Please ensure you have entered your billing address, so we know where to send you your checks! Please note that at this point you are registering as a customer. We will create you artist account later.

2) Send us an email indicating that you want to be part of the Artist Gallery Program. Include a link to your website, if you have one, or 5 examples of your work.

3)We will send you an email once your account has been created. You can then log on to your account and upload high resolution JPGs of your artwork.

How to Upload:
1) Log on to you account
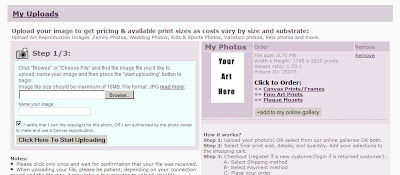
2) Click the "My Uploads" tab at the top of the screen
3) Click on the "browse" button and select the files from your computer, then hit "upload". (the file type must be JPG, and the maximum file size is 16 MB)
4) Once the image has been uploaded, click the "add to my gallery" button under the image.


Complete your profile

Your customers will want to know some information about you and your work. Completing your profile will give them some extra information if they are curious.
All of this information can be entered under the "My Gallery" tab in your profile.
You can include a Bio by in the "Gallery Settings" section. This will let people know a little more about you and the ideas and experience behind your work.
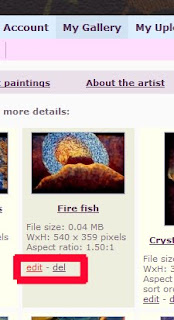
In "My Gallery" you will see two words under each image you have uploaded, "edit and "del"


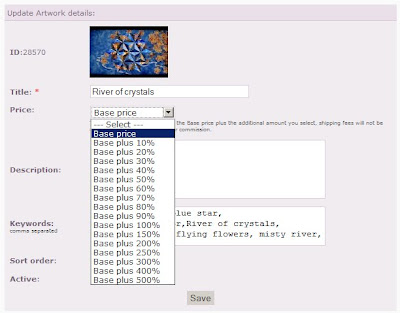
If you click edit, you will be taken to a page where you can enter a description of the work and keywords to help people search.

clicking "del" will remove the image from the gallery.
This is also the page where you adjust your pricing.
Don't forget to hit "save" at the bottom of the screen when you are done!


Pricing

Now you get to define the price we will sell your work for. Canada On Canvas makes its money from the printing cost, so you may increase the price by adding a percent of the printing cost, all of which you will receive. We set the base price at printing plus 10%, so if you do not adjust the price you will receive ten percent of the printing cost whenever your work sells.

Since we offer your customers the option of ordering your canvas prints in a variety of sizes an media, the base price is variable. This is why your commission is a percentage and not a strait dollar amount. An example might make this clearer.

If you upload an image and leave the price as "base price", and someone orders a 16X20 gallery wrap, they will pay $121.00 (before taxes and shipping). You will receive $11.00. If they order a 20X30 gallery wrap, they will pay $161.70, and you will receive $14.70.

If, however, you set the percentage in the drop-down menu to 30%, they the customer would see the price as $154.00 for a 16X20, and you would receive $44.00 (30+10(base commission)=40% of printing price).

Getting Paid

If your account balance reaches $100.00 in any month, we'll send your payment before the end of the following month via check or PayPal. For example, if your account balance reaches the payment threshold during August, we'll send you a payment at the end of September.

if you have further questions please check our FAQ, or contact us.